NEW TAKE ON TOTS

Let be completely honest here, we all know that tater tots are perfect in every single way. From breakfast to dinner, and even as a midnight snack, there no time of the day that I would object to eating a nice crispy tot (well, maybe before I went for a run or something, but that’s besides the point). I personally enjoy my tots to be crunchy and crispy, but even when they’re soggy, tots aren’t half bad.  So you’d wouldn’t believe my excitement when I came across a recipe for LOW CARB TOTS, which are made with cauliflower instead of potatoes! With my craving for tot and love of cauliflower, I had to try this recipe!!!!

CHECK OUT THE RECIPE I USED HERE!

(3)


Of course I took the liberty in changing up the recipe  a little to make it a little more accessible and flavorful!

TIPS, HINTS, AND CHANGES!

  • Processed with RookieChange: This recipe calls for raw cauliflower; HOWEVER, I used frozen cauliflower and it worked well.
  • Tip: If you are using frozen cauliflower, MAKE SURE YOU FOLLOW THE INSTRUCTIONS AND  YOU PRESS ALL OF THE EXTRA WATER FROM CAULIFLOWER.
  • Hint: The recipe suggest you let the mixture sit, HOWEVER, I didn’t and do not think it’s necessary, especially if you are on a time crunch.
  • Tip: I didn’t use any onions, but I added some chopped spinach leaves to my tots for added flavor. I suggest adding chopped carrots or broccoli to the mix for different flavors and texture!
  • Change: I only used a little bit of pepper jack cheese, to cut down the calories (or maybe because I only had a little…) and it tasted great! Add however much or little you’d like.

Review of the Recipe: The outcome of these cauliflower tots were better than I’d expected! Unlike normal tots, they had  more flavor, due to the combined cheese. ALSO, this was my first time frying anything, and it was definitely A LOT easier than I had imagined,which pleasantly surprised me!   Not to say I’m going to be frying everything from now on, but it’s a great feat to check off my bucket list! Next time I make these, I am going to try and bake them, instead of frying, just to make them a bit healthier!  I personally didn’t make the chipotle mayonnaise, but instead dipped mine in hot sauce!

FUN FACT:  “Tater Tots” is actually a registered trademark of Ore-Ida.

Popeye Approved Chips!

Veggie chips are all the rage recently! I cannot  look on Pinterest’s Food&Drink section without seeing at least five different recipes for different kinds of veggie chips.  From zucchini to sweet potato and even kale, it seems that EVERY vegetable is being chip-ified.

Wanting to jump on to the chip bandwagon and try one of these healthy alternative for the classic chip, I made my own creation: a spicy cajun spinach chip! Recipe as follows:

photo 1 copy 11

Cajun Spinach Chips

Ingredients:

  • Two cups of spinach
  • 1/2 – 1 tsp of olive oil
  • Cajun Seasoning (My favorite is Slap Ya Mama, get it here!)
  • A pinch of salt
  • A  sprinkle of garlic powder (optional)

Instructions: 

  1. Preheat oven to 325 degrees
  2. Place two cups of spinach in a bowl and add  1/ 2 to 1 tsp of olive to slightly coat the leaves.
  3. Add Cajun seasoning, mixing thoroughly  to coat each leave.  Use as much as desired.
  4. Lightly grease  a baking sheet wrapped with foil. 
  5. Place leave in a single layer on the baking sheet and bake for 6 to 8 minutes, depending on desired crispiness.
  6. After removed from the oven, let cool for a minute or so before removing them from the foil.
  7. Once removed enjoy  as a tasty, spicy and crunchy snack.

TIPS&HINTS:photo 2 copy 8

  •  BE SURE NOT TO DRENCH THE LEAVES IN OLIVE OIL OR THEY WILL SHRIVEL UP.
  • Make sure you remember to grease the foiled pan so the spinach leaves do not stick.
  • I suggest using regular spinach leaves opposed to baby spinach leaves. I originally  used baby spinach leaves and they crumbled easiler.
  • I ALSO suggest that you try to use fresh spinach because  they will yield a more chip like texture.

(Recipe based off this recipe)

FOR THE LOVE OF HUMMUS: My Homemade Hummus Recipe

From my prior post you may have come to the conclusion that I am a BIG fan of condiments.  Basically anything I can put peanut butter or hot sauce on are my  favorite foods. But recently I’ve been getting more and more into hummus.  I have always like it for the casual dipping of veggies and pita chips, BUT now I can say I am OBSESSED WITH IT!! I find reasons to put it on anything and I could eat virtually anything with hummus on it (This is NOT an exaggeration! I find raw carrots to be repulsive and consider them the Devil’s vegetable, but lately I’ve even been eating them with hummus!!). HUMMUS IS A GAME CHANGER PEOPLE!

Taking my enthusiasm for hummus to the next level, I’ve decided I’d take a whack at making my own ! Utilizing what I had in my fridge and pantry, I concocted a flavor packed hummus creation! Recipe as follows:


photo copy 8

Garlic Tomato, Spinach and Olive Hummus

Serving: 2-3

Ingredients:photo 1 copy 10

  • 1/2 cup chickpeas
  • 1 tbsp dices garlic tomatoes
  • 2-3 large black olives
  • handful of baby spinach (approximately 8 leaves)
  • 1 1/2 tsp olive oil
  • 1 tbsp  water
  • pinch of salt/ ground pepper for taste


Instructions: 

photo 3 copy 4

Desired texture of the blended chickpeas.

  1. Prep ingredients: Remove skin from chickpeas, cut steams off the baby spinach, and slice olives.
  2. First, place chickpeas into a blender (or magic bullet) and blend for a minute to two until grainy like sand.
  3. Add half  of the tomatoes, olives, and spinach. Proceed to blend for about a minute until ingredients mix in with the chickpea.
  4. Add 1 tsp on olive oil and 1/2 tbsp of water and blend until smooth, about two minutes.
  5. Add the remaining ingredients, oil and water until completely blended and smooth.
  6. Then add a pinch of salt and pepper (more or less depending on how you want it to taste) and pulse giving the hummus a final mix. You may need to add a bit more water or oil depending on the constancy.
  7. Chill for at least 20 minutes then enjoy with veggies, chips, or anything of you choosing!
photo 4 copy 3

My homemade hummus & spinach chips! SPINCH CHIP RECIPE COMING SOON!!

This flavorful hummus is a fresh and healthy snack that can be put on anything from celery, to pita chips, to rice cakes and more! Compared to store bought hummus, my homemade hummus had a more powerful chickpea flavor. The flavors of the tomatoes, olive, and spinach added a more depth of flavor; however, next time I  think I’ll add a little extra garlic for a kick. I cannot wait to play around with adding different flavors to my hummus. What type of hummus do you think I should try making next? Reply in the comments!!  

Note: I am eating spoonfuls of hummus as I write this and I am loving every moment of it.


RUN WHILE YOU CAN

Photo retrieved here.

Photo retrieved here.

By no means do I consider myself to be excellent runner, with my only real competitive running experience was being a member of my middle school’s cross country team, but it’s something I really enjoy doing. Although, it wasn’t until after I joined my college’s crew team, did I truly discover my love of running (this may be because ANYTHING is better than crew workouts).  I’ve since quit crew, but my love for running still prevails.

Running is a freeing experience for me. It allows me to clear my mind of any worries and just focus on the road ahead of me.  I am a fan of trail runs (or running outside in general) because of the different terrain and difficulty of the trail paths; however, because of weather restrictions this isn’t always possible. So, in the winter months I find myself running on the treadmill (YUCK!). BUT thanks to Pinterest and the beautiful people of the internet, I’ve found several guides to make treadmill workouts a bit more bearable:

Here are a few of my favorites:

  • This workout is a more structured schedule.
  • This workout gives you more freedom to customize.
Scenic picture of the Hudson, I took on one of my many bridge adventures.

Scenic picture of the Hudson, I took on one of my many bridge adventures.


Now with the weather warming up, I am back where I belong running outside, and with the Walkway Over the Hudson  and the FDR Trails within miles from my school, I’d say I’d hit the running jackpot! After a long day of work and classes, it’s great to be able to clear my head and take in the fresh air and not to mention the beautiful view! Hoping to run a 5k sometime this summer, I am taking advantage of these resources more and more as the weather is warming up.  Even if you are not a runner, both the Walkway and the trails are beautiful destinations to take a leisurely walk! Here are some links that will lead you to more information on Walkway Over the Hudson and the FDR trails.

 ~Stay motivated~

It Takes Two: Simply GUILT-FREE Banana “Ice Cream”

Last week, the Hudson Valley was shown a glimpse of spring as the sun has been beamed down melting the remaining snow.  The little perks, like walking around outside without my winter jacket, has left me in all my glory. Looking for a little refresher to get my taste buds to adjust to the coming of spring, I decided to take a crack at making two ingredient, guilt free   Banana Peanut Butter “Ice Cream”. Recipe as follows:

Image

Banana Peanut Butter “Ice Cream”

Ingredients:

  • 2 (very) ripe bananas
  • 1-2 tbs of peanut Butter

 Instructions:Image

  1. Slice ripened bananas into equivalent pieces, about an inch thick. Then place each flat onto a plate or baking sheet then place in the freezer of at least an hour.
  2. After you remove the banana’s from the freezer, place them into a blender (I used a magic bullet) with 1 tbs of the peanut butter and blend until smooth.
  3. Place the mixture back into the freezer for around an hour, and enjoy guilt free!

TIPS&HINTS:

  • Image When first freezing the bananas, leave them in the freezer for about two hours.  If you need to leave them in the freezer for a longer amount of time make sure you let them thaw out a little before blending them.
  • I added a pinch of cocoa powder to the ice cream to add a different dimension of flavor. Next time, I plan on adding some cinnamon! Experiment with the recipe and make it your own!
  • The next time I make this, I will add more peanut butter to mellow down the overwhelming banana flavor and mostly because I love peanut butter!

As a refreshing treat after a long run or if you are just craving a simple sweet snack, this ice cream is healthy, easy to make, an delicious!!


THE CHEW

1382865_10202772629429867_31419065_n

About a week ago, my mom and I took a trip into the city to see a taping of ABC talk show, The Chew.

I wish I could say that the whole experience was on a whim, BUT a lot of planning went into making the day a success.

I don’t personally watch the show daily (especially not when I’m in school), but over the summer I would always find myself catching episodes while I was at the gym, go figure! Knowing I was going to be home for spring break, I figured it would be a great idea to witness what goes behind the scenes of a food themed TV show.

Steps to get YOU to The Chew:

  1. Request Your Tickets: About a month or two before the show date you’d like to attend you must fill out a request at ImageTHIS website stating who you are, how many people are in your party, the date you’d prefer to see the show, and a back up date.
  2. RSVP: If they have room and can fulfill your request, they will email you the date (out of the two that you provided) as well as a time(as they shoot at 9 a.m. and 12:15 p.m. Tuesday-Thursday) . If you can attend, you reply to their email with the information they requested (the parties name, the full name of everyone in your party)
  3. The Follow Up: After RSVP-ing you will receive a few emails as the show approaches regarding what to bring and what wear for the taping. The show I saw was on the first day of spring, so we were told to wear bright and jewel tone colors!
  4. The DAY: On the day of the taping, they tell you to arrive a little more than an hour before the show starts, no later (We were told to arrive BY 11 a.m. for our 12:15 p.m. show). However, I would
    suggest getting their earlier because there really is not guarantee you will get into see the tapping. Once you arrive at the studio, you wait outside on line and producers usher you in by group. Once you get in, you receive a ticket and they guide you into the waiting room which has small snacks and water.  THEN, they begin to call tickets and take you into the studio, seat you, and you enjoy the show!!!

photo 1 copy 8

FUN FACTS:

  • I went to see the show on a Thursday; however, it was really the Friday morning show they were taping.
  • I was really interesting to watch all the people and preparation that goes into the show before they started taping and during commercial breaks. They went from having the 4 co-host being the only ones on set to a mob of 30 people moving things and setting up during breaks.
  • It was also incredible how many young people were working on the show. Most of the producers had to be only in their mid twenties!

    photo 2 copy 6

    Left: Carla and Michael Symon greeting some audience members. Right: Clinton taking a selfie with an audience member.

  • The hosts, Chef Michael Symon, Carla Hall, Clinton Kelly, and guest host Chef Curtis Stone (taking the place of Daphne Oz and Chef Mario Batali) were incredibly friendly.  During commercial breaks, they talked and danced with all of the audience members, especially Carla! They took pictures and chatted with the audience after the show ended and all of them seem to be having a really good time  and were enthusiastic towards being there.
  • The people who sit on the tasting panel are chosen in advance of the show, which was kind of a bummer because I would have lover to be up-close and personal to the cooking!

During the show Chef Michael Simon made grilled shrimp and a pea salad, which the panel and a handful of audience members go to taste, Curtis Stone made Tipsy Arnold Palmer made with ginger ale and Bourbon, and Carla headed the craft corner for this show, making springtime table centerpieces out of coffee filters. The one thing I wished was that they supplied the entire audience with sample of what they were making, but you can’t have it all I guess!  After seeing the taping of the Chew, I realized it isn’t as much about the preparation and technique of creating the food or crafts, but rather the personalities of the co-hosts and their interactions with each other, guests, and the audience.

1959409_10202772629109859_991433777_n

Left to right: My mom, Carla Hall, and I

Seeing The Chew was a really fun and inexpensive experience ( the tickets are free, the only thing you need to worry about is transportation to the studio and maybe getting a bite to eat after the show).  If you live close to the city and are looking for a behind the scenes look at a fun and fresh talk show environment, I’d recommend you check it out!   


My Take on TACOS

Being home for spring break and having what seems like an abundance of time and resources to concoct a culinary masterpiece, I combined three recipes I had been dying to try and held a healthy alternative to the classic taco night for my family!

When you think of the classic taco, you think soft/hard corn or flour tortilla, some kind of protein (beef, chicken, or fish), some sort of salsa or pico de gallo, maybe some rice and/or beans, and cheese. All those wonderful ingredients evoke the flavors of comfort and excitement on your tongue.  I LOVE TACOS, I love most Mexican food to be completely honest because most dishes give such a depth of flavor!

So I took those normal elements and found an alternative to make them a bit healthier by creating a lettuce wrapped taco stuffed with jalapeño-lime chicken, spicy quinoa with corn and peppers, and a zucchini, corn and tomato salad.

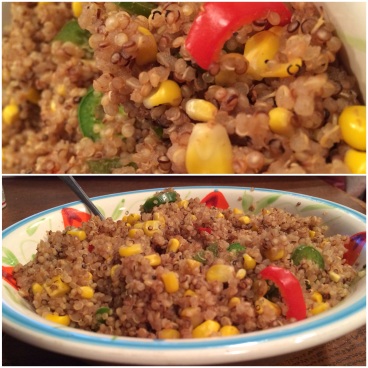
The quinoa I made was based off of THIS RECIPE, with some added changes to make it my own!

photo copy 5

The quinoa was a nice spicy addition to the tacos. It could be used as a side dish or inside the taco (I did both). Along with the jalapeños the recipe states, I also added some red bell peppers for a more mild flavor. In the taco, it acted as beans and rice as quinoa adds a starchy element and the corn and peppers add a little bursts of flavor and freshness.  Adding the cocoa to the quinoa really gave it that mole kind of flavor, really adding to the Mexican flare.

Hint: Quinoa is a pretty bland grain and so much flavor can be added and changed to make quinoa go with any type of dish you are making!

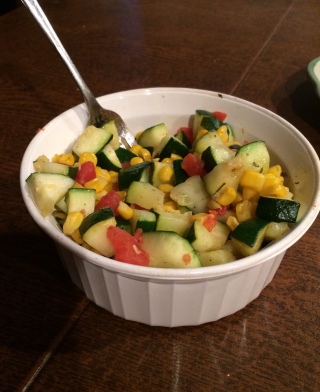
The zucchini and corn salad is based off THIS RECIPEphoto 3 copy 3This salad is great because it is so versatile! It can be served hot or cold and can be used in the taco or as a side dish! With only 62 calories a serving, this salad is a fresh and delicious way to lighten up a taco! I also added diced tomatoes to my own salad to add more a different note of flavor to the salad.

For the jalapeño-lime chicken I followed THIS RECIPE precisely.

photo 2 copy 4

This chicken’s lime and jalapeño flavor went incredibly well with the similar flavors of the other ingredients incorporated into this taco. Tip: Let the chicken marinate for around 24 hours. I only let mine marinate for about 2 hours, and it definitely would have had a lot more flavor if I would have let it marinate for a longer amount of time.

So after all the elements were made, it was now time to assemble this healthy alternative to your normal taco!

photo 4 copy 2


HOW TO ASSEMBLE:
(assembling the taco really gives artistiphoto 1 copy 7c freedom, but here are some tips on how I did it!)

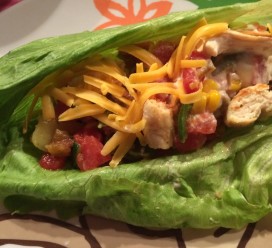
  • First you need to have your lettuce wraps washed and ready to be stuffed   (I used iceberg lettuce, but romaine would work as well!). The light flavor of the lettuce really lets you taste all the different flavors of the various elements of the taco and it also adds another element of crunch!
  • Then add a layer of your quinoa, followed by a few pieces of chicken ( I found that 3 medium pieces worked the best for me), then add a little of the zucchini salad, followed by as much salsas and cheese you desire!
  • ENJOY! AND MAKE A COUPLE MORE WITHOUT FEELING GUILTY!


Processed with RookieI made this meal for my parents when I was home for spring break and it was a hit! My parents are pretty health conscious and really think about everything that goes into their bodies (for the most part). They also LOVE spicy food, so I was inspired by them to create this meal! The prep time of the entire meal really didn’t take too long and because the meal has individual elements that can stand on their own, there is a lot room to change it up and make it your own or simply make one of the elements of the taco a solo meal!

ENJOY!!

That’s a Wrap: Breakfast Edition!

So on the last edition of That’s a Wrap, I gave you a recipe to my italian twist on a quesadilla.

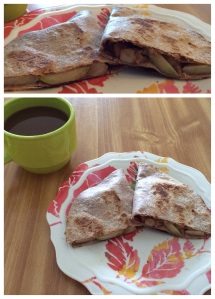
STILL having plenty of whole wheat wraps left over and needing breakfast, I decided to take a shot at making a breakfast quesadilla with peanut butter and apples! (It should be obvious that I am a big fan of the quesadilla concept).  The recipe is as follows:

Ingredients:photo 2 copy 3

  • 1 whole wheat tortilla
  • 1 apple (I used granny smith)
  • 2-3 tbsp spoons of peanut butter
  • 1/2 tsp of cinnamon
  • 1/2 tsp of honey

Instructions:

  1. Wash apple, then cut entire apple into slices (as seen in the picture above)
  2. Set aside half of the apple slices, then take the remaining apple slices and dice then into small pieces.
  3. In a small bowl, mix the diced apple pieces with cinnamon and honey
  4. In a frying pan on medium heat, add the diced apples mixture and sauté until softened and caramelized, usually 2-3 minutes. Then remove from heat and set aside in a small bowl.

    photo 5 copy

    Caramelized cinnamon honey apples

  5. Then spread peanut butter throughout the wrap, leaving about a half inch from the edge plain, without peanut butter. Then arrange apple slices on one side of the wrap (See picture for how I assembled it).                                                    photo 3 copy 2
  6. Return frying pan to medium heat and place the dressed wrap flat in the pan. Allow to heat for about 2 minutes, or until peanut butter begins to melt/liquify.
  7. Scatter the previously sautéed cinnamon honey apples on to the wrap.
  8. Fold over the side of the wrap without apples. Leave it heated on this side until the wrap reached desired crispiness. Then flip and repeat.
  9. After your quesadilla is cooked to your liking, remove from heat. Let cool for a moment and then enjoy the peanut butter goodness!

photo 4 copy

TIPS&HINTS:

  • I used granny smith apples because they are sour, which is a good complement to the sweet and saltiness the peanut butter brings. However, any apple of your preference would work.
  • As for peanut butter, I prefer Skippy Natural, but any peanut butter of your preference would do the job. I bet this would be great with crunchy pb or even almond butter for an even healthier alternative.
  • Although, I made this on heat you could make this cold if you are on the go or to take for lunch.

Being a lover of peanut butter, this warm mix of peanut butter and apples was a perfect and tasty breakfast! With the apples and the whole wheat tortilla as a source of fiber and peanut butter for protein, this breakfast quesadilla has all the nutrients to start the day off right! And with the added cinnamon and honey to add a depth of flavor, this sweet “quesadilla” is a sweet and satisfying meal.

Soulful Outing

Going to school in the Hudson Valley, for a foodie like myself, is dream come true. Down the road from Culinary Institute of America and surrounded by tons of amazing eateries, I’ve taken advantage of all the good food surrounding me. This weekend a friend and I ate at a place I’ve been eyeing for quite a while,  Soul Dog, and I can tell you it was an extremely soulful experience.

The soulful low down:

Our Dogs: Top- Sam's Paleo Dog: chicken dog with quac and bacon in a bun (usually in a lettuce wrap) Middle- Soul Fries Bottom- My Thai Delight Dog: chicken dog, spicy peanut sauce, cucumber, jalapeño scallions, in a lettuce wrap (usually served in a bun)

Our Dogs:
Top- Sam’s Paleo Dog: chicken dog with quac and bacon in a bun (usually in a lettuce wrap)
Middle- Soul Fries
Bottom- My Thai Delight Dog: chicken dog, spicy peanut sauce, cucumber, jalapeño scallions, in a lettuce wrap (usually served in a bun)

Soul Dog- a glutton free oasis, located in Poughkeepsie, is a specialized hot dog shop providing customers with more than your basic beef hot dogs. They have chicken, beef, tofu, and italian sausage dogs to fit the fancies of all their patrons!  But these aren’t just your normal dogs with ketchup and mustard (although you can get that!). Some of their specialty dogs include:

  • The Picnic: a beef dog with mac’n’cheese, baked beans and BBQ sauce
  • Tex-Mex: a beef dog with black bean salsa, guac, and chipotle cream
  • The Herbivore: a tofu dog with guac and quinoa chilli
  • The Soul Dog ( of course!): a beef dog with soul sauce, sloppy joe, and chipotle cream
  • along with many others that can be found on their MENU

They even have the option to create your very own customized dog in which you select the type of dog, bun, and array of toppings you want all with the option of making them glutton free! They also have sandwiches and other specialty items, including soups, nachos, a beer and wine menu, and a kids menu, so Soul Dog is guaranteed to satisfy.

photo copy 3

A look at the interior of Soul Dog!

Not only is the food awesome, but the interior of Soul Dog is bright and unique. With crayons on every table, guest are encouraged to draw something soulful that they may even hang on their walls!

I LOVED everything I had at Soul Dog (a Thai Delight dog with Soul Fries) and

Our soul-art. Top: My Soul Dog (Obviously I'm not an artist) Bottom: Sam's psychedelic Soul Dog

Our soul-art.
Top: My Soul Dog (Obviously I’m not an artist)
Bottom: Sam’s psychedelic Soul Dog

have made it a mission to try everything on the menu! If you are in the area, I encourage you to check it out because it’s affordable and pretty stinking good. Whether you are glutton free or not, Soul Dog has a little bit of everything to insure a soulful eating experience for all!

That’s a Wrap

Being a college student on a budget, I gotta work with what I got. And as the weeks approaching spring break are dwindling down, I’m trying to use all my perishable food before I leave to make sure nothing goes to waste.  Luckily on my last trip to the grocery store I bought a package of whole wheat tortillas, which are extremely versatile and can be used for wraps, quesadillas,chip and the list goes on.

So utilizing my wraps and some produce and other ingredients I had in my fridge, I made my own version of a quesadilla. The recipe is as follows:

Ingredients: 

photo 3

Measured out spinach, tomatoes, and cheese.

  • 1 whole wheat tortilla
  • 1 hand full of raw spinach
  • 1/2 cup of mozzarella cheese
  • 2 spoonfuls of diced tomatoes
  • teaspoon of olive oil
  • pinch of salt & pepper

Directions:

  1. In a frying pan on medium heat, add 1 teaspoon of olive oil, and spread throughout pan.
  2. Then add raw spinach to the pan and sauté until all is cooked, adding as much salt and pepper as desired
  3. photo 2 copyRemove the pan from heat and set aside cooked spinach in a bowl and mix with the diced tomatoes.
  4. Place the pan back on medium head and place whole wheat tortilla  flat into the pan.
  5. Add a layer of the cheese (about half) on to one side of the tortilla. Then add mixture of tomato and spinach on top of the cheese. Then add the remaining cheese on top. ( seem in the picture)
  6. Before folding the bares side of the tortilla over, let the top cheese melt almost completely. Then you should be able to fold it with a spatula. After you have folded the wrap so it is quesadilla like, you can remove from heat or keep in pan and flip until the wrap has reached its desired crispiness.
photo 1 copy 2

I added a half of a grape fruit to finish off a delicious and nutritious meal!

This meal is definitely an alternative to your traditional quesadilla. By adding spinach and tomatoes, and using mozzarella cheese, it strays far away from the traditional Mexican flavors and instead incorporates some added Italian flair (we all know how much I LOVE  Italian food). This recipe can manipulated and changed effortlessly by incorporating different ingredients, or by adding a little more this and a little less of that it really gives you the opportunity to make it your own. Over all this meal took me about 15 minutes to make, together with prep and cooking (and probably less time to eat it).  So simple,easy, and pretty darn healthy! 

If you like this recipe, have longer time to cook and want to greatly develop the Italian flavors of the dish, check out Giada De Laurentiis’s version of an elevated Italian quesadilla.